Graphics HW and SW Stack
This section provides a more detailed illustration of animation across the software and hardware stacks on both the CPU and GPU, and explains how data flows between the CPU, the GPU, and each layer of the software stack.
The previous section, 3D Modeling, described the information stored in 3D models and how it is used for animation.
The following section, SW Stack and Data Flow, describes how each frame is generated to display motion and skinning effects using the small animation parameters stored in a 3D model and sent by the CPU.
The following section, Role and Purpose of Shaders, explains how different visual effects can be achieved by switching shaders and applying different materials across frames.
Reference:
HW Block Diagram
The block diagram of the Graphic Processing Unit (GPU) is shown in Fig. 5.
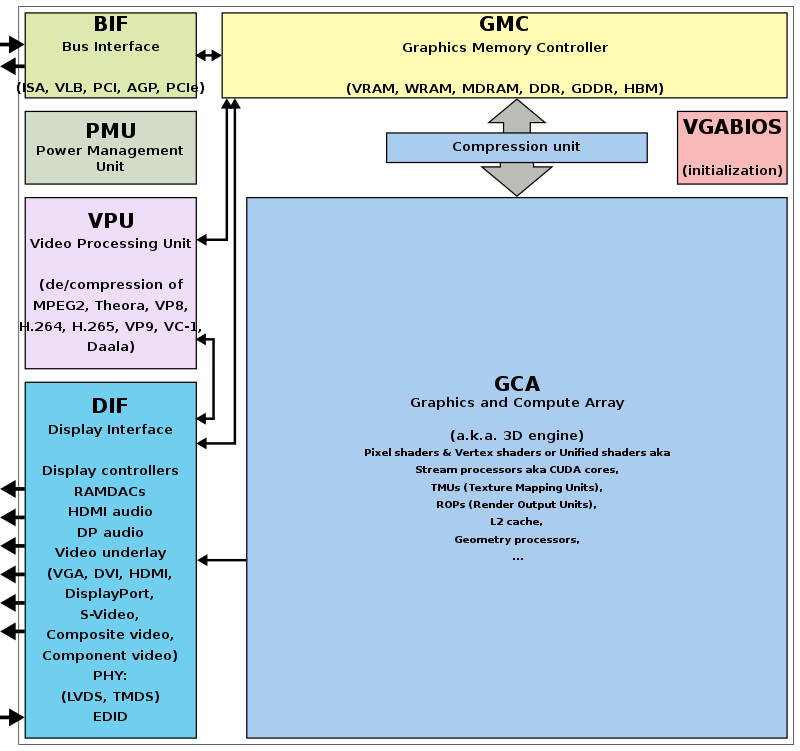
Fig. 5 Components of a GPU: GPU has accelerated video decoding and encoding [1]
The roles of the CPU and GPU in graphic animation are illustrated in Fig. 6.
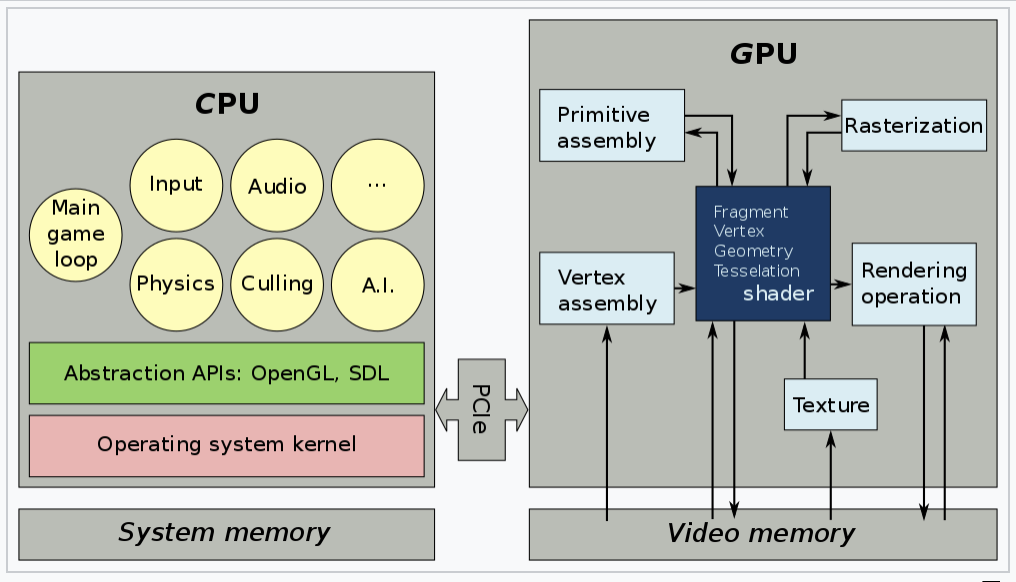
Fig. 6 OpenGL and Vulkan are both rendering APIs. In both cases, the GPU executes shaders, while the CPU executes everything else [2].
A GPU cannot directly read user input from a keyboard, mouse, or gamepad; play audio; or load files from a drive. Therefore, the GPU cannot handle all animation-related work on its own [3].
A graphics driver consists of an implementation of the OpenGL state machine and a compilation stack to compile the shaders into the GPU’s machine language. This compilation, like most driver work, is executed on the CPU. The compiled shaders are then sent to and executed by the GPU. (SDL = Simple DirectMedia Layer) [4].
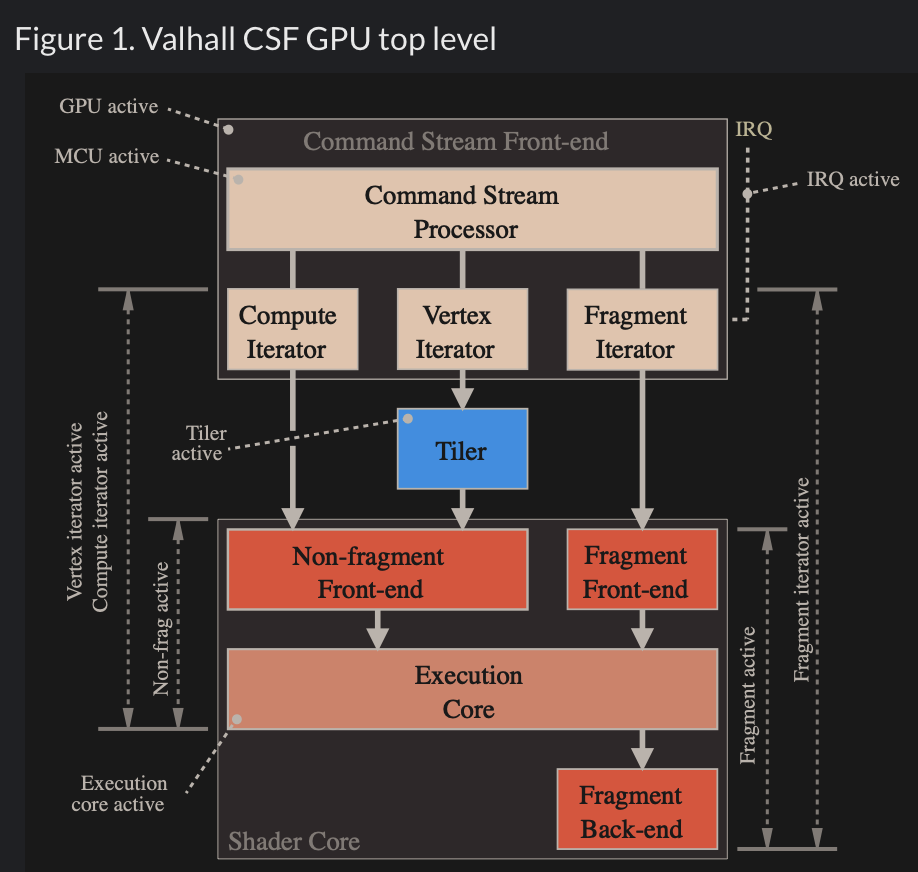
Fig. 7 An MCU and specialized hardware circuits accelerate CSF (Command Stream Frontend) processing [5].
The GPU driver writes commands and data from the CPU to GPU-visible memory over PCIe. On Arm GPUs, these commands form a Command Stream Frontend (CSF). A GPU chipset contains many SIMD processors (cores). To accelerate command processing, the CSF is represented in a compact form. As shown in Fig. 7, the chipset includes an MCU (microcontroller) and specialized hardware that translates the CSF into data structures for individual SIMD processors.
SW Stack and Data Flow
The driver runs on the CPU side as shown in Fig. 8. The OpenGL API eventually calls the driver’s functions, and the driver executes these functions by issuing commands to the GPU hardware and/or sending data to the GPU.
Even so, the GPU’s rendering work, which uses data such as 3D vertices and colors sent from the CPU and stored in GPU or shared memory, consumes more computing power than the CPU.
![digraph G {
rankdir=LR;
compound=true;
node [shape=record];
subgraph cluster_cpu {
label = "CPU (Client)";
CPU_SW [label=" 3D Model | Game Engine | { OpenGL API | Shaders \n (built-in functions)} | <f1> Driver"];
}
subgraph cluster_gpu {
label = "GPU Hardware";
subgraph cluster_gpu_sw {
label = "3D Rendering Pipeline \ndescribed in a later section";
ModelData [label="3D Model Information\n(VAO, VBO, textures,\nindex buffers, materials)"];
}
}
CPU_SW:f1 -> ModelData [label="1. Create mesh resources:\nVAO, textures, and other data from the 3D model;\ncompile shader-executable code."];
// label = "Graphic SW Stack";
}](_images/graphviz-c970cc669ccfcb681bdab4758d6e71c59ee0e6d5.png)
Fig. 8 Graphic SW Stack and data flow in initializing graphic model
✅ As described in the Animation section and Fig. 8, the game engine’s built-in C++ renderer handles OpenGL, Vulkan, or Metal calls automatically. Users set values such as speed and velocity and customize the animation logic.
After the user creates a skeleton and textures for each model and sets keyframe times using a 3D modeling tool, users can write gameplay scripts (Java code, C#, Blueprints, GDScript, Python, etc.) to tell the engine to play animations [6].
As described in the Node-Editor (shaders generator) section, graphics designers and technical artists create skin materials, while software and graphics programmers create additional materials with node-editor tools (shader generators). These tools generate the shaders used for rendering.
Shaders may call built-in functions written in Compute Shaders, SPIR-V, or LLVM-IR. LLVM libclc is a project for OpenCL built-in functions, which can also be used in OpenGL [7]. Like CPU built-ins, new GPU ISAs or architectures must implement their own built-ins or port them from open source projects like libclc.
The CPU evaluates the stored keyframes to produce motion and other animations, as illustrated in the Animation section.
![digraph G {
rankdir=LR;
compound=true;
node [shape=record];
subgraph cluster_cpu {
label = "CPU (Client)";
CPU_SW [label=" 3D Model | Game Engine | { OpenGL API | Shaders \n (built-in functions)} | <f1> Driver"];
}
subgraph cluster_gpu {
label = "GPU Hardware";
subgraph cluster_gpu_sw {
label = "3D Rendering Pipeline \ndescribed in a later section";
ModelData [label="3D Model Information\n(VAO, VBO, textures,\nindex buffers, materials)"];
UniformUpdates [label="Uniform Updates\n(bone matrices, morph weights,\nmaterial parameters, time, etc.\nsee note below)", style=filled, fillcolor=lightgreen, color="black"];
}
}
CPU_SW:f1 -> UniformUpdates [label="2. Animation:\nIssue draw commands and update uniforms\nfor each rendered frame"];
// label = "Graphic SW Stack";
}](_images/graphviz-03a63fe414886f80e4ddb17be049e86b6bc292d4.png)
Fig. 9 Graphic SW Stack and data flow in rendering
The per-frame data is not the full set of vertices, but rather a small set of animation parameters called uniform updates, as shown in Fig. 9 and described later.
Note
Bone matrices determine the positions of triangles within a 3D model during animation. This bone transformation data is much smaller than the complete mesh of the 3D model. We will provide an example and explain this in more detail in the Animation Example section. Because this transformation data is small and constant across all shader pipeline stages, it is stored in the GPU’s global memory and can be cached in the uniform/constant cache for performance, as illustrated in Fig. 68 of Memory Subsystem section.
The CPU updates only these small animation parameters and issues draw commands to the GPU.
![digraph GPU_Pipeline {
rankdir=LR;
node [shape=box, style=rounded, fontsize=12];
UniformUpdates [label="Uniform Updates\n(bone matrices, morph weights,\nmaterial parameters, time, etc.)"];
ModelData [label="3D Model Information\n(VAO, VBO, textures,\nindex buffers, materials)"];
GPURendering [label="GPU Rendering\n(vertex shader, fragment shader,\nskinning, morphing, rasterization)"];
Framebuffer [label="Framebuffer\n(Video-Memory Output)"];
UniformUpdates -> GPURendering;
ModelData -> GPURendering;
GPURendering -> Framebuffer [label="Rendered Image"];
}](_images/graphviz-b215659348849b133da5a563416d875d503964cc.png)
Fig. 10 The input and output for GPU rendering
The 3D rendering pipeline is illustrated in Fig. 10.
Object-shape data is described by VAOs (Vertex Array Objects) in OpenGL. This is explained later in the OpenGL section. Additionally, OpenGL provides VBOs (Vertex Buffer Objects), which allow vertex array data to be stored in high-performance graphics memory on the GPU and enable efficient data transfer [8] [9].
After the GPU receives the uniform updates from the CPU, it performs the computationally intensive per‑vertex work within the rendering pipeline to generate the final pixel values for each frame displayed on the screen. These final pixel values are collectively referred to as the Rendered Image.
✅ “Rendered Image” = the final per‑frame output written into the framebuffer. The Uniform Updates will be described in detail later.
✅ The CPU updates only the small animation parameters called uniform updates, as shown in Fig. 9; the GPU performs the computationally intensive per-vertex work.
As mentioned in the previous section on animation movement, 3D modeling tools store keyframes, bone transforms at each keyframe, and related data, then use this information to perform animation.
The CPU updates only the bone transformation data …, rather than updating the entire vertex or mesh data for each animation frame. These updates are very small—on the order of kilobytes rather than megabytes. For each rendered frame, the CPU sends these small updates to the GPU, and the GPU takes over the animation work from the CPU. This type of movement animation is called skinning, and is illustrated as follows:
Skinning
Skinning is a vertex deformation technique used to animate a mesh by attaching its vertices to a hierarchical skeleton (bones). Each vertex stores one or more bone indices and corresponding weights that describe how strongly each bone influences that vertex.
During animation, the application updates the bone transformation matrices. The vertex shader then computes the final vertex position by blending the transformed positions according to the stored weights. This allows the mesh to bend, twist, and deform smoothly as the skeleton moves.
Skinning does not create new geometry or smooth the surface topology. It only transforms the existing vertices of the mesh. Examples include bending an arm, flapping a wing, or deforming a flexible tube as its bones rotate.
The CPU updates only high-level animation state, such as:
Current animation time
Bone matrices (small)
Morph weights
Material parameters
Particle emitter settings
Global uniforms (camera, lights, etc.)
These are tiny updates — kilobytes, not megabytes.
In practice, game engines normalize the weights so that their sum is 1.0: \(\Rightarrow \sum_{i=0}^{N-1}\mathbf{weight}_i = 1.0\)
Example: Bending an Arm
Imagine a character’s arm mesh. Each vertex in the elbow area has weights like:
70% influenced by upper‑arm bone
30% influenced by lower‑arm bone
When the elbow bends:
Upper‑arm bone rotates
Lower‑arm bone rotates
GPU blends the influence
The elbow area deforms smoothly
This is skinning.
✅ After GPU processing, the color pixels are written to the framebuffer (video memory). The display device (monitor, LCD, OLED, etc.) fetches these pixels and displays them on the screen. The interface between the framebuffer and the display device is explained in the next section, Displaying Pixels.
Displaying Pixels
The interface between the framebuffer and the display device is shown in Fig. 11.
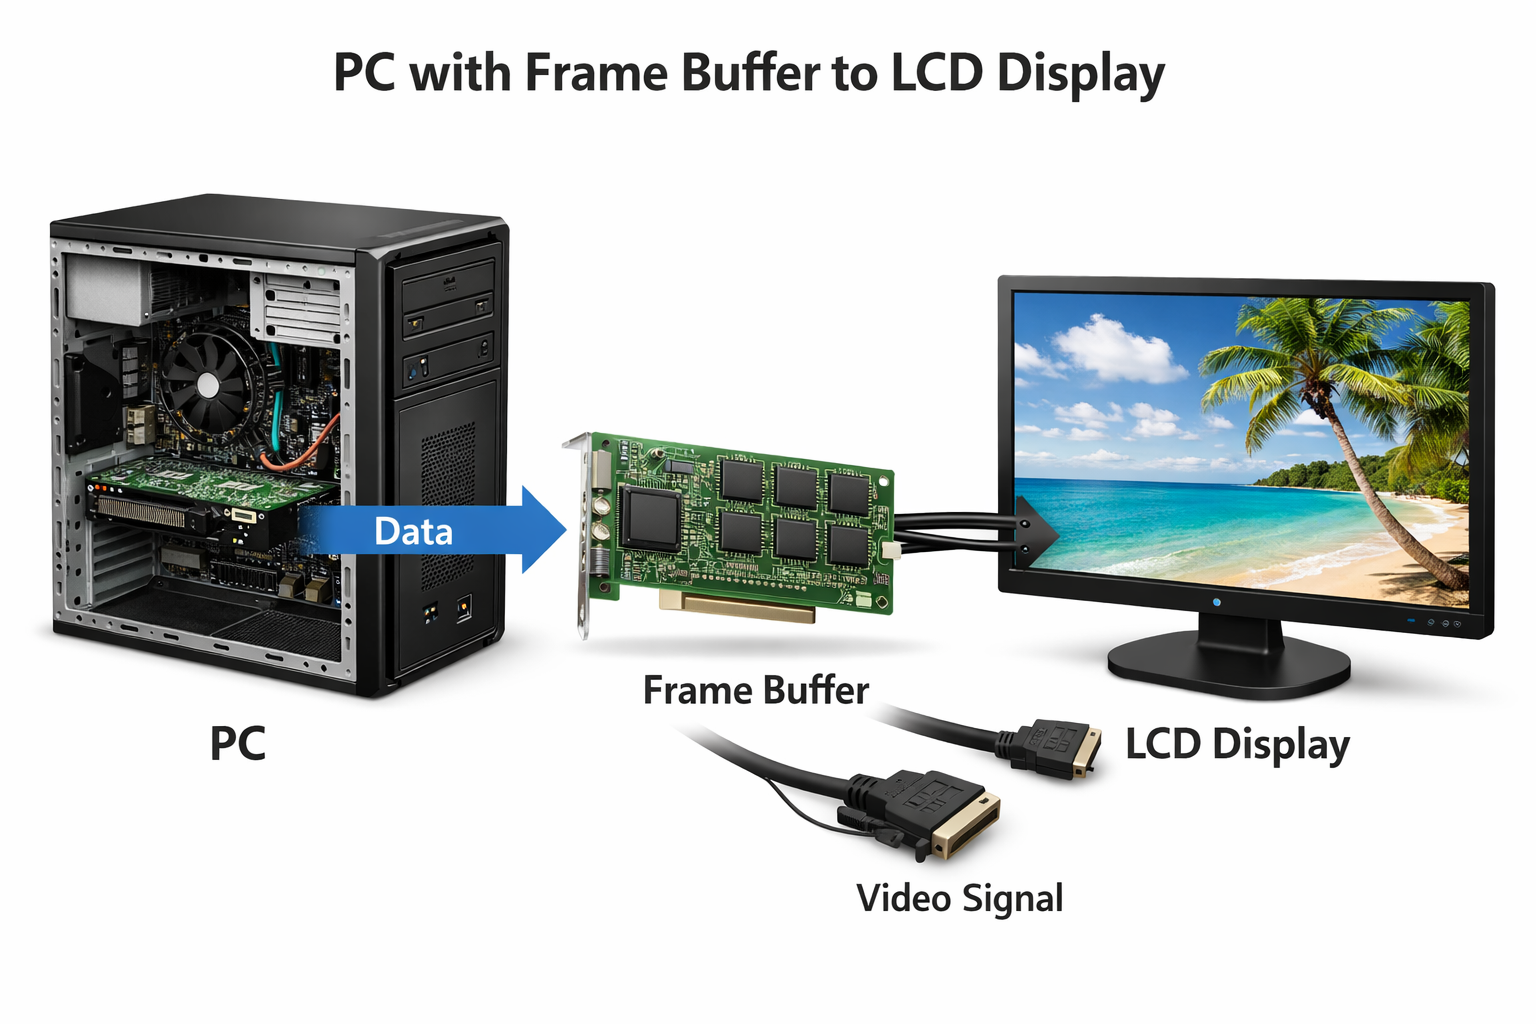
Fig. 11 PC with Frame Buffer to LCD Display
The GPU and display (monitor, LCD, OLED, etc.) use VSync, NVIDIA G-SYNC, or AMD FreeSync to prevent screen tearing, as described below:
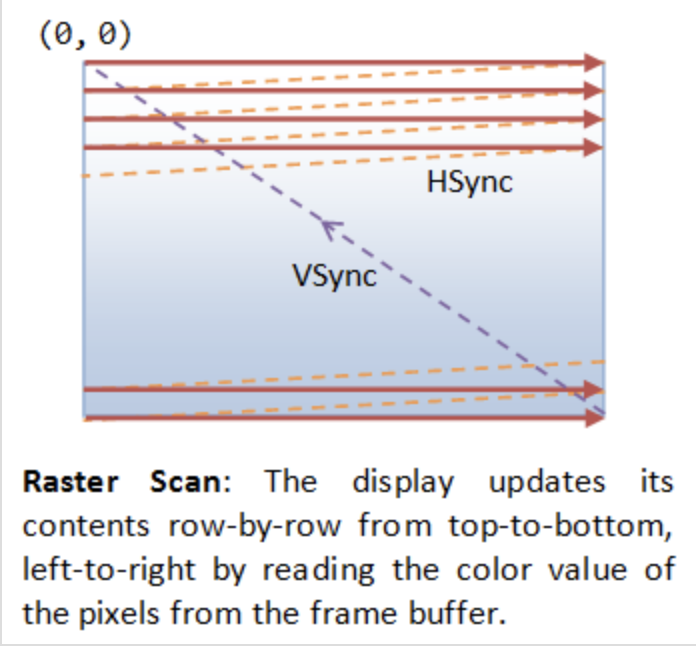
Double Buffering
While the display is reading from the frame buffer to display the current frame, we might be updating its contents for the next frame (not necessarily in a raster-scan manner). This would result in so-called tearing, in which the screen shows parts of the old frame and parts of the new frame. Double buffering resolves this issue. Instead of using a single framebuffer, a modern GPU uses a front buffer and a back buffer. The display reads from the front buffer while the GPU writes the next frame to the back buffer. When the frame is complete, the GPU swaps the front and back buffers (a buffer swap or page flip).
VSync
A refresh period is roughly:
visible scan-out → blanking interval (including VSync) → next visible scan-out
Visible scan-out: the display reads pixel rows from top to bottom and shows them.
Blanking interval: a short time after the last row and before the next first row. Historically the electron beam returned to the top; modern LCD/LED displays retain a timing interval for coordination.
- VSync: a timing signal within that blanking interval indicating the boundary
between refreshes.
vertical blanking interval = front porch + VSync pulse + back porch
Front porch: brief delay after the last visible row finishes.
VSync pulse: timing signal that marks synchronization between refreshes.
Back porch: brief delay after the VSync pulse before the first visible row of the next frame starts.
In most display modes, the visible scan-out becomes slower because the pixel clock is lower. The blanking/VSync interval may also change somewhat, depending on the timing mode, but it is usually a small part of the total period.
Changing from a 5-cycle refresh period to a 10-cycle refresh period doubles the time for the entire refresh interval:
active scan-out + blanking/VSync interval = 10 cycles
5 cycles per refresh → VSync occurs every 5 cycles.
10 cycles per refresh → VSync occurs every 10 cycles.
If the refresh period is changed from 5 cycles to 10 cycles on an LCD or LED display, the display scans the screen more slowly: the active scan plus its blanking interval portion together occupy the 10 cycles.
Double buffering alone does not solve the entire problem, as the buffer swap might occur at an inappropriate time, for example, while the display is in the middle of displaying the old frame. This is resolved via the so-called vertical synchronization (or VSync) at the end of the raster-scan. When the application signals the GPU to perform a buffer swap, the GPU waits until the next VSync to perform the actual swap, after the entire current frame is displayed.
Tearing
To avoid tearing, the GPU runs at half the refresh rate of the display,
as shown below.

GPU      |  GPU is writing buffer A  | GPU is writing buffer B |

Display  | VSync B |

Display  | VSync B and stay on B | VSync A and stay on A |
                                   ^
                                   |
                                tearing
As the text diagram above illustrates, enabling VSync prevents the display from presenting frames faster than its refresh rate. If the GPU can render frames faster than the display refresh rate, the additional frames are not presented; VSync still prevents tearing.
If an application presents frames with VSync enabled at a fixed cadence, its displayed-frame cadence may be an integral fraction of the display refresh rate: 1/1, 1/2, 1/3, 1/4, and so on.
Examples on a 60 Hz display:
GPU/app ≥ 60 FPS: 1/1 → 60 presented FPS (extra rendered frames may be dropped or replaced).
GPU/app = 30 FPS: 1/2 → 30 presented FPS.
GPU/app = 20 FPS: 1/3 → 20 presented FPS.
GPU/app = 15 FPS: 1/4 → 15 presented FPS.
NVIDIA G-SYNC and AMD FreeSync
If your monitor and graphics card both in your customer computer support NVIDIA G-SYNC, you’re in luck. With this technology, a special chip in the display communicates with the graphics card. This lets the monitor vary the refresh rate to match the frame rate of the NVIDIA GTX graphics card, up to the maximum refresh rate of the display. This means that the frames are displayed as soon as they are rendered by the GPU, eliminating screen tearing and reducing stutter for when the frame rate is both higher and lower than the refresh rate of the display. This makes it perfect for situations where the frame rate varies, which happens a lot when gaming. Today, you can even find G-SYNC technology in gaming laptops!
AMD has a similar solution called FreeSync. However, this doesn’t require a proprietary chip in the monitor. In FreeSync, the AMD Radeon driver, and the display firmware handle the communication. Generally, FreeSync monitors are less expensive than their G-SYNC counterparts, but gamers generally prefer G-SYNC over FreeSync as the latter may cause ghosting, where old images leave behind artifacts [11].
The Role and Purpose of Shaders
The flow for 3D/2D graphic processing is shown in Fig. 13.
![digraph G {
rankdir=LR;
compound=true;
node [shape=record];
subgraph cluster_3d {
label = "3D/2D Modeling Software";
subgraph cluster_code {
label = "3D/2D Code: Engine, Shaders, etc.";
Api [label="<a> OpenGL API | <s> Shaders (animation shaders\nor shaders written by the programmer)"];
}
}
subgraph cluster_driver {
label = "Driver"
Compiler [label="Online Compiler"];
Obj [label="obj"];
Linker [label="Online Linker"];
Exe [label="exe"];
}
Api:a -> Obj [lhead ="cluster_driver"];
Api:s -> Compiler;
Compiler -> Obj -> Linker -> Exe;
Exe -> GPU;
Exe -> CPU [ltail ="cluster_driver"];
// label = "OpenGL Flow";
}](_images/graphviz-fbd89a34e22d3531f387f7a8cffc8d3b43926609.png)
Fig. 13 OpenGL Flow
Compiled shaders are sent to the GPU when the application calls
glLinkProgram(). At that point, the driver prepares the shader binaries for
GPU execution.
glLinkProgram() is called when an application finishes preparing a shader program —
not when creating a mesh, and not when issuing a draw command.
When a game calls glLinkProgram() to relink a shader program, the shaders
must be compiled and prepared for the GPU.
This usually happens during game startup, level loading, or the creation of a new shader variant (e.g., enabling shadows, fog, skinning).
Games switch shaders constantly — sometimes hundreds of times per frame — but they do not re‑link them.
When a game runs, different materials, effects, and rendering passes use different shaders.
Examples of switching shaders:
When the player enters a snowy biome, ice meshes use the ice shader.
The axe blade uses a metal PBR shader. When the axe blade strikes stone, a particle shader renders the sparks.